Glock 17/19/26 Operating Instructions
Article Posted: March 15, 2013
The Glock 9 millimeter family of pistols are versatile polymer frame based semiautomatic auto-loading handguns, designed for duty carry as either a concealed or openly carried sidearm. They are based on a "striker fired" design in which the cartridge primer is struck by a spring powered rod as opposed to a firing pin and hammer, leading to simplification in design and implementation. The three models available are the full size Glock 17, with a 17 round magazine capacity; the compact Glock 19 with a 15 round capacity, and the sub-compact Glock 26 with a 9 round capacity. Most Glocks issued are of the compact Glock 19 model, which is comparable in accuracy and range to the M9 Beretta. The basic conditions of the pistol are as follows:
Condition 1: Magazine inserted, slide forward, round in chamber.
Condition 2: Does not apply.
Condition 3: Magazine inserted, slide forward, chamber empty.
Condition 4: Magazine removed, slide forward, chamber empty.
Please take note that this family of weapons has no external safety aside from the trigger safety, which prohibits the weapon from firing if dropped or jolted but will disengage as soon as rearward pressure is applied to the trigger.
Operation of the pistol is straightforward, and similar to the M9 in some respects. Below the controls of the pistol are identified, please observe that the slide release and magazine release are located on the left side of the pistol to aid right-handed shooters.

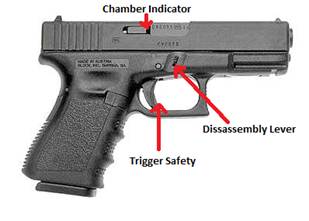
The controls of the pistol include the magazine release, which when pressed inwards will eject the magazine; the trigger and integral trigger safety; the slide release to send the slide back into battery when locked back; the disassembly lever which allows the upper receiver to be removed from the lower; and the chamber (round) indicator, which raises outwards and becomes flush with the slide when a round is chambered. Later models will have a notch that protrudes from the ejector to be more visible to the shooter when taking aim.
Disassembly is accomplished through removing the magazine and clearing the weapon, ensure that all ammunition is removed and away from the cleaning area. After the weapon is clear, point the muzzle into a clearing barrel or downrange and pull the trigger. Next, grasp the grip in one hand while using the other to apply rearward pressure to the slide while simultaneously pressing down the disassembly lever from both sides of the weapon. Once the disassembly lever is disengaged, pull the slide and upper receiver forward in the direction of the muzzle and away from the grip and lower receiver. Once separated, press the spring guide assembly forward towards the muzzle with a thumb and then direct it upwards away from the rest on the barrel. Gradually release thumb pressure to avoid releasing spring tension rapidly and shooting the spring across the room. The slide may then be held up and the barrel will fall out, or the slide placed on its back and the barrel lifted out. No further disassembly of the pistol is required for cleaning; do not remove the rear striker cover for any reason.
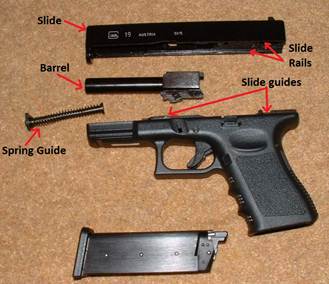
For cleaning purposes, the lower receiver slide guides should be thoroughly cleaned and lightly oiled, the same goes for the rails machined into the slide. Normal cleaning to remove all powder residue and debris should be conducted for every part, and brass residue removed from the bolt face. Glock does not recommend using metal barrel brushes, but instead a nylon chamber and bore brush with a light application of CLP should be used. All OTIS M9 kits will include a suitable nylon brush. Lightly lubricate the top of the barrel and chamber, as well as all contact points between the barrel and slide prior to reassembly. Reassembly is the reverse of the disassembly with one exception: once the barrel and spring guide are reinstalled into the slide, install the slide and cycle it to the rear most position on the pistol as if chambering a round. This will allow the disassembly lever to reset and catch the barrel in battery.
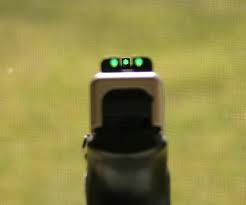
Employment of the Glock 19 is fairly standard, and uses the same pistol shooting basics as any other standard side arm. The fundamentals of pistol shooting are aiming, breath control, and trigger control, all built off of two common stances. The Weaver stance employs a "push-pull" action between the firing and non-firing hand, with the feet staggered roughly shoulder width apart and the non-firing foot placed forward and generally pointing at the target. The firing arm should be extended straight and the non-firing arm bent slightly to enhance stability. The isosceles stance involves having shoulders squared to the target, feet shoulder width apart and on line (or with the non-firing foot slightly forward) and both arms extended straight out to meet the pistol. In either stance, the firing hand should have a high and firm grip on the pistol, with the trigger finger able to contact the trigger with the middle portion of the second joint. The non-firing hand should wrap around the firing hand, covering as much of the grip as possible and thumbs parallel to each other, tight to the frame but not interfering with the slide release. The Glock pistols will misfire with a "stovepipe" malfunction if the pistol is shot with a limp wrist, so the grip should be firm in order to transfer recoil energy to the torso from the hands. Aiming is accomplished with the "three dot" method, where the front sight dot is the point of focus, and the two dots on either side of the rear sight are placed on-line and with even spacing to the front sight dot. The front dot is then placed center mass on the target, and even rearward pressure is applied to the trigger while the shooter is in their natural respiratory pause. Some older models will have a front dot and a white "U" on the rear sight, however the same principles apply with the front dot centered in the "U."
For loading, reloading, and basic remedial action drills, there are some significant differences due to the nature of striker fired pistols. The trigger pull will remain constant from the first shot to the last, and the slide will lock in the rear position when the last round is fired. To load the pistol, ensure the muzzle is either pointed straight up or down range and insert the magazine until it is locked in place. With a fully loaded magazine, this may require an additional tap on the bottom of the magazine. Firmly grasp the pistol grip with the firing hand and grasp the serrations on both sides of the slide with the non-firing hand and pull back while applying forward pressure with the firing hand. Release the slide when it reaches its rearmost position and allow the spring to move the slide back into battery. To speed reload, simply depress the magazine release while aiming down range and allow the magazine to fall from the pistol. Insert a loaded magazine and either depress the slide release or pull slightly back and the slide and then release it to chamber a round. For a tactical reload, the same procedures apply although the pistol may be oriented skyward and the empty magazine retained. Remedial action follows the same procedure regardless of stoppage: after pulling the trigger and failing to fire, observe the chamber by canting the weapon to the left while pointing down range. If there is an obstruction, remove the magazine and rack the slide to remove it, and then perform a speed reload.
It may be necessary to lock the slide to the rear to remove the obstruction. If the slide is locked to the rear, remove the magazine and perform a speed reload if no rounds are observed through the action (if thumb position is incorrect, it may cause undue engagement of the slide lock so be sure that the thumbs do not interfere with its movement). If there is no obstruction and the slide is forward, tap the bottom of the magazine, rack the slide, and attempt to fire. If the weapon still fails to fire, perform a speed reload.
The Glock family of pistols are extremely reliable and user friendly, however they should still be kept clean and be subjected to no more abuse than any other firearm. Please observe all basic weapons safety rules (treat every weapon as if it were loaded; never point your weapon at anything you do not intend to shoot; keep your weapon on safe until you are ready to fire; keep your finger straight and off the trigger until you intend to fire) while handling weapons, and use only the 9x19mm Para bellum round. Magazines between all 9mm models are interchangeable in that the smaller framed pistols will accept the larger magazines. Blackhawk offers tactical holsters in all the same configurations that can be found for the M9, such as the Serpa RT (NSN 1095-01-523-5340). Please contact your armorer for more information regarding this weapon system.
Thanks to SSgt Peter Barnes for his service to our country & for the informative article
Please like and share the article.
Related Articles
Please like, share, favorite, bookmark, and comment. Thank You.


-d257e97bb023464c1600b4fd1a634a31.jpg)